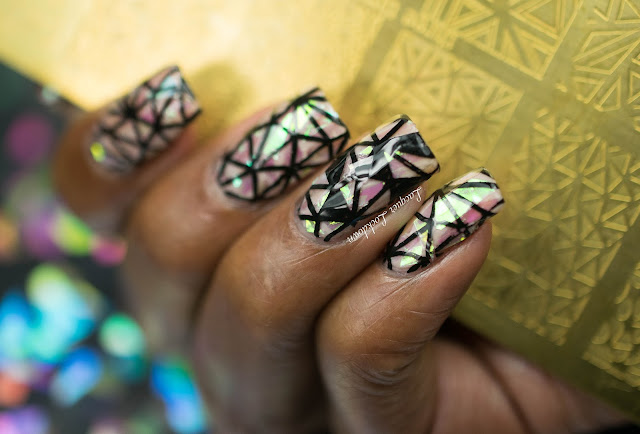
Unless you've been living under a nail art tomb, which you definitely shouldn't be if you're reading my blog, you've heard of the shattered glass trend! This comes straight out of South Korea from the creative mind of Park Eun Kung of Unistella. You can read a bit more about the lady behind the trend here in Vogue. Have you seen these nails and if you have what do you think of them? When I first saw this design I immediately thought I have to try this with stamping. Of course I'm not just gonna repeat what other people are doing. My venue has always been stamping so when I see something novel I always think about ways to incorporate it into my own style of nail art. I wanted something open and abstract and pretty. Let me show you what I ended up with ;)
Mani-louge
Basecoat/Topcoat: UNT Take Flight Peel Off Basecoat / Poshe Fast Drying Topcoat
Base color: OPI Barre My Soul (jelly)
Stamping polish: Mundo de Unas Black (1)
Stamping plate: Pet'la Plate Three Times
Accents: Cellophane
The sliced up cellophane pieces I used were actually a gift I received from a friend during a GB. How about that? I had these nifty bits lying around my house for a couple of years and only when I was digging through my nail art bin did I find them. However I ordered some that weren't cut up like the ones I used here because the pieces that I have which are precut are really a pain in the ass :/ Yeah I said it. It would be easier to cut down the pieces myself to structure my nail art. Plus these were quite firm as well.

And I recorded this one as well. I have to admit now that I have gotten a bit more into the habit of recording my nail art adventures its a bit easier on my end to create tutorials. Plus I love my new camera! I'm also trying really hard to up my photography and hand poses. I'm a little obsessed these days, but at this juncture I really want to get everything as lovely as possible.
So I thought I'd include some helpful tips for those interested in doing your own shattered glass nails. Here are a few lessons I learned:

1. Shattered glass nails really lend themselves to gel nails, i.e. gel nail polish. Because of the nature of the pieces they really did not lay down totally flat. In addition a lot of topcoat was needed for that ultimate smooth barrier. If I had just been able to lay down my color with gel polish and then cured the tacky surface would have been perfect for cellophane placement and then the topcoat would have taken care of the bumps in one go. So if you do gel nails at home this art will definitely be easier for you to handle.

2. Preparation is better than perspiration! What I mean is having the pieces you are going to be placing separated and laid out on a surface is the best way to get everything placed down quickly before the glue completely dries. For my first attempt i was scrambling all over the place and as a result my glue dried before I placed all the cellophane down. I learned my lesson the second time around.

3. Sometimes a little trim is necessary when a piece of cellophane won't lay down properly. Giving it a good trim with your scissors will help you out a great deal! I had to do this a few times and it helped immensely.
4. Patience homie! I talk about patience a lot on this blog, but its a necessary evil. Its needed for advanced techniques and its damn sure needed for new ones! When I finished my first nail with the placement I was like ok ok not bad. The second nail looked like barf. I had to literally go back and trim and poke and prod and topcoat until it turned into something reasonable. Yeah man patience.
5. Peel off base coat is your FRIEND! Ack, trying to take these nails off with acetone without a peel off base coat was a PITA. Yes I did all the silly things first ;) Do yourself a favor and put down a peel off base coat first to keep your sanity intact when you are ready for removal.

So what do you think? Has anyone else tried this nail art trend yet? I had a lot of fun making these. Fun as in spent hours carefully applying small bits of plastic to my nails so that they would look killer. Followed by stamping and sealing. Lol I'm not even sure I'm sane any longer. I now know why every single time I've attempted glitter placement nails I gave up before I finished the first nail. Yeah lol. But these were worth it absolutely! Seriously it was like factor 5 bling! Plus I realized I haven't spent nearly enough time playing with my Pet'la plates. I hope you liked it and if you're over on Youtube give me a thumbs up


Thoughtful blog thanks for posting
ReplyDelete